Tuesday, November 11, 2014

St. Petersburg Chain Bead stitch - Learn how

This week I am going to show you how easy it is to learn the beaded St. Petersburg Chain. This bead stitch design can be used to make necklace or bracelets. You can also use a variety of beads to add dimension to your piece. I have seen a lot of instructions on this stitch and some make it look so complicated when it is actually a very easy stitch to learn. And It works up very quickly. It also has a natural curve which makes it the perfect necklace. I have shown 3 samples so you can see how versatile the stitch can be.
Next time I will show you how easy it is to do the Double St. Petersburg Chain Bead stitch.


---------------------------------------------------------------------------------------------------
Start by waxing and stretching your thread, use Nymo D or C-Lon & a #11 or #12 beading needle. Tie in a "stopper" bead, leaving about an 8" tail and begin at step #1.


1.
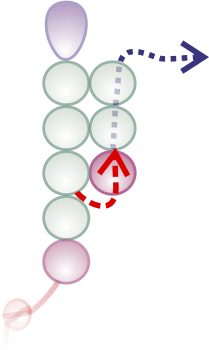
Pick up 1B, 6A, go with thread up through the 3rd and 4th A beads just added in this step.


2. Pick up 1C, go with thread down through the 4th, 3rd and 2nd A beads added in the previous step.


3.  Pick up 1B, go with thread up through the 6th and 5th A beads added in step #1.


4.  Pick up 4A, go with thread up through the 1st and 2nd A beads just added in this step. Make sure to pull up thread so that the 1st A bead added in this step is snug and next to the 5th A bead, step #1.


5.  Pick up 1C, go with thread down through the 2nd and 1st A beads added in the last step, and the 5th A bead, step #1.


6. Pick up 1B, go with thread up through the 4th and 3rd A beads, step #4.


7.  Pick up 4A, go with thread up through the 1st and 2nd A beads just added in this step. Make sure to pull up thread so that the 1st A bead added in this step is snug and next to the 3rd A bead, step #4 or #7.


8.  Pick up 1C, go with thread down through the 2nd and 1st A beads added in the last step, and the 3rd A bead, step #4 or #7.


9.
Pick up 1B, go with thread up through the 4th and 3rd A beads, step #7.


10. Continue by repeating steps #7, #8 and #9 until you reach the length that you would like.


St. Petersburg Chain Bead stitch - Learn how
http://www.SandraDHalpenny.com
Sandra D. Halpenny 2014 - 2024All rights reserved
This pattern may not be copied or distributed in any way without the express written permission of the author. The purchaser of this pattern may use the finished piece for personal use and for selling at arts and crafts shows, etc. No mass production of this design is permitted without permission from the author.

Wednesday, November 5, 2014

Basic Net 3 Necklace


This is another fast and fun necklace to make. You can also make a bracelet from the same pattern. So make yourself a necklace and bracelet and you will be all ready for the party.


A = 11/0 seed bead, main color

B = 11/0 seed bead, 2nd color

C = 4 mm crystals

Start by waxing and stretching your thread, use Nymo D or C-Lon & a #11 or #12 beading needle. Tie in a "stopper" bead, leaving about an 8" tail and begin at step #1.


1. Pick up 6A, 7B, 3A, go with thread up through the 1st A bead just added in this step.

2. Pick up 3A, 4B, go with thread down through the 7th B bead added in the previous step.


3. up 1C, 4B, go with thread up through the 1st B bead added in step #2.


4.
Pick up 7A, go with thread down through the 1st B bead (of the 4B), step #3.


5. Pick up 6B, 5A, go with thread up through the 4th A bead, step #4.


6. Pick up 9A, go with thread down through
the 1st A bead, step #5.


7. a) Pick up 3B, 1A, 3B, 1C, 3B, go with forward through the A bead just added in this step.
b) Pick up 3B, 5A, go with thread up through the 5th A bead, step #5.


8. a) Pick up 9A, go with thread down through the 1st A bead, step #7(b).

b) Pick up 7B, 3A, go with thread up through the 5th A bead this step at (a).

c) Pick up 3A, 4B, go with thread down through the 7th B bead, this step at (b).

d) Pick up 1C, 4B, go with thread up through the 1st B bead, this step at (c).

e) Pick up 7A, go with thread down through the 1st B bead, this step at (d).

f) Pick up 6B, 5A, go with thread up through the 4th A bead, this step at (e).


9. Continue necklace by repeating steps #6, #7 & #8 until you reach the length that you want your necklace to be.


10. To add clasp, Pick up 3A, clasp, 3A, go with thread up through the 2 A beads in necklace. Continue with thread around through the clasp beads several times. Weave in and end thread. Repeat the clasp directions in the same manner on the other end after removing the stopper bead.


If you would like to watch a video of the illustrations, go to:


Basic Net 3 Necklace Free Pattern, N0238 
http://www.SandraDHalpenny.com
Sandra D. Halpenny © 2007 - 2014 All rights reserved
This pattern may not be copied or distributed in any way without the express written permission of the author. The purchaser of this pattern may use the finished piece for personal use and for selling at arts and crafts shows, etc. No mass production of this design is permitted without permission from the author.

Thursday, October 30, 2014

Jamie Cloud Eakin‘s Bead Play with Fringe - BOOK REVIEW


Jamie Cloud Eakin ‘s Bead Play with Fringe:
Techniques, Design and Projects
published by JCE Publishers (softcover $19.95 US) focuses on how to make several different types of fringe with beads. 

 
The first chapter covers supplies needed to create your fringe. Jamie tells you about seed beads, needles, tools and more supplies that will be used.
The second chapter gives you a brief overview of what types of fringe she will be showing you how to make. Some of the type of fringes she will show you is Standard, Kinky, Branch and much more. Also in this chapter you are shown different ends at the bottom of the fringe too. This is important because different ends will give you different looks.
In chapters three through seven, Jamie starts to explain in greater detail how to create the different type of fringes. Each chapter is dedicated to a different fringe and also includes several projects you can make using the fringe you just learned to make. What I especially like is that she explains how to add fringe properly and what to do if there are problems with the way it hangs. She also teaches you how to design fringe to match your project. She also covers the proper way to add fringe to beadwork showing different thread paths.
The final chapter covers some basic beading techniques. For example, how to start and finish thread.
There are 30 projects, mostly jewelry, and a combination of bracelets, earrings, and necklaces. The projects include illustrations and color photographs of the projects.
This book is a great addition to any beader that wants to add a special touch to some of their projects.

What I personally like about Jamie’s book is that she shows how to make proper fringe. Fringe is not one of my favorite things to make or write instructions for. I have customers always asking me why I don’t design more ornaments. Now they can follow the directions on my blog at: “How to change any of my necklace patterns into an ornament cover”  . Use any of my necklace or bracelet patterns, and then by using Jamie’s book and following her Fringe instructions, the designs can be endless of not just ornaments but so much more that can be made. How about adding fringe to some of my necklace patterns too.

From Jamie’s site here is a
Sample sheet for Bead Play with Fringe in PDF format.
About the Author Jamie Cloud Eakin has been a professional bead artist for over two decades, and she teaches and sells her work in galleries across North America. She is the author of Beading with Cabochons (Lark 2005) and Bugle Bead Bonanza (Lark 2010), Dimensional Bead Embroidery (Lark 2011) and Bead Embroidery Jewelry Projects (Lark 2013). Jamie lives in Modesto, California.
She was born in Illinois and now resides in California. Her love of beads was born in Illinois and now resides around the world in her books and her beaded creations sold in fine galleries. Her books range from the complicated and exquisite to the simply fun and beautiful. All of the books are full of beautiful photographs and clear, concise illustrations and instructions. Other books which feature some of her designs include Bedazzled (P Diamonti), Beading with World Beads (R. Hemachandra), The Beaders Color Palette by Margie Deeb and Beading All Stars (Lark 2014).

All-star beadwork author Jamie Cloud Eakin turns her attention to the fabulous fun of fringe. Although adding fringe to beadwork is popular, there is no other comprehensive book that catalogues and details the unique aspects of fringe. The techniques detailed include standard, loop, kinky, branch and several twisted/spiral fringe styles. There are 30 projects for beaders to hone their skills while creating beautiful beadwork. Ms Eakin is known for her ability to explain and illustrate beading techniques and also includes considerations for fringe design in this must have book for beading enthusiasts.
Jamie Cloud Eakin web page: http://www.studiojamie.com/