Showing posts with label Crystal Lace Necklace Patterns. Show all posts

Monday, April 8, 2019

Jade Lace Necklace Pattern

Seed beads, 4mm crystals and the new 2 hole Wibeduo beads make a beautiful necklace. I used 2 colors of the seed beads and a beautiful jade color on the Wibeduo beads.   

This Pattern is Free here on my Blog.
To Purchase a Downloadable PDF for $1.49
Click HERE

Bead Store
A = Miyuki 11° SEED bead, color 1, 84* beads
B = Miyuki 11° SEED bead, color 2, 54* beads
C = 4 mm crystals, 14* crystals
W = Wibeduo 2 hole bead, 3* beads
Nymo D, C-Lon Thread or Fireline (4 or 6 pound), #11 or #12 beading needle

*Beads counts are per repeat (Unit), repeats for this necklace are about 1 inches.

1. Pick up (1C, 1A, 5B, 1A, 1C), 2A, go with thread forward through ( ) beads just added in this step.

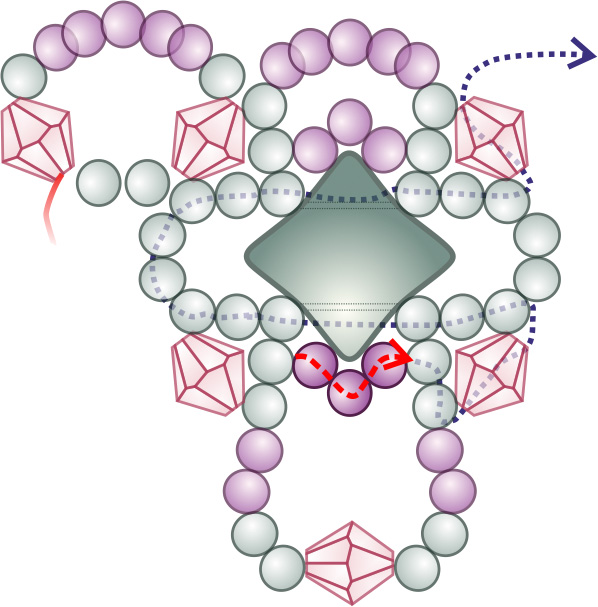
2. Pick up 3A, 1W, 3A, 1C, 2A, go with thread right to left through the 1 A bead, top hole of the W bead and the next A bead as shown.


3. Pick up 2A, 5B, go with thread down through the last 2 A beads, step #2.


4. Pick up 3B, go with thread up through the 2 A beads, step #3, down through the C bead, step #1 or step #11, left to right through 3 A beads, the top hole of the W bead and the next 3 A beads, step #2.


5. Pick up 5A, go with thread right to left through the bottom hole of the W bead, step #2.


6. Pick up 5A, go with thread left to right through 3 A beads, the top hole of the W bead and the next 3 A beads, step #2, forward through the 5 A beads, step #5, the bottom hole of the W bead and through the 1st A bead just added in this step.


7. Pick up 2A, 1C, go with thread left to right through the 3rd, 2nd and 1st A beads, step #6, the bottom hole in the W bead, step #2, and the 5th A bead, step #5.


8. Pick up 2A, 1C, go with thread right to left through the 3rd, 4th and 5th A beads, step #5, and down through the 2 A beads just added in this step.


9. Pick up 2B, 2A, 1C, 2A, 2B, go with thread up through the 2 A beads, step #7.


10. Pick up 3B, go with thread down through 2 A beads and up through the C bead, step #8. Continue with working tread by following the blue dotted line in illustration, coming out with the working thread up through the C bead, step #2.


11. Pick up (1A, 5B, 1A, 1C), 2A, go with thread up through the C bead, step #2, and forward through ( ) beads just added in this step.


12. Repeat step #2 through #8.


13. Pick up 2B, 3A, 1C, 3A, 2B, go with thread up through the 2 A beads, step #7.


14. Pick up 3B, go with thread down through the 2 A beads, step #8, 2 B beads, 3 A beads, top hole of the W bead and the next A bead, step #13.


15. a) Pick up 2A, 1C, go with thread down through the 3rd and 2nd A beads (second set of 3 A beads), step #13.
b)
Pick up 3B, go with thread up through the 2nd and 1st A beads, step #13.


16. Pick up 1C, 2A, go with thread right to left through the 3rd A bead, top hole of the W bead and the next A bead, step #13, and the 2 A beads, step #15a.


17. a) Pick up 5A, go with thread left to right through the bottom hole of the W bead, step #13.
b) Pick up 5A, go with thread right to left through the 2 A beads, step #16, the 3rd A bead, top hole of the W bead and the next A bead, step #13, and the 2 A beads, step #15a, forward through the 5 A beads added in this step at (a), the bottom hole of the W bead, step #13, and the 1st A bead just added in this step.


18. a) Pick up 2A, 1C, go with thread right to left through the 3rd, 2nd and 1st A beads, step #17b, the bottom hole in the W bead, and the next A bead, step #13.
b) Pick up 2A, 1C, go with thread left to right through the 3rd, 4th and 5th A beads, step #17, the bottom hole of the W bead, the next A bead, step #13, and down through the 2 A beads added in this step at (a).


19.  a) Pick up 7B, go with thread up through the 2A, beads, step #18b.
b) Pick up 3B, go with thread down through the 2A, beads, and up through the C bead, step #18a, right to left through the 3rd, 2nd and 1st A beads, step #17b,and the bottom hole in the W bead, step #13. Continue with working tread by following the blue dotted line in illustration, coming out with the working thread up through the C bead, step #2.


20. Pick up (1A, 5B, 1A, 1C), 2A, go with thread up through the C bead, step #2, and forward through ( ) beads just added in this step.


21. Repeat step #2 through #11


22. Continue by repeating steps #12 through #21 until the necklace is the length that you would like. Add clasps of your choice on both ends Continue with thread around through the clasp beads several times for strength. Weave the working thread into the necklace and end.

Jade Lace Necklace Pattern, N0376
http://www.SandraDHalpenny.com
Sandra D. Halpenny © 2019 All rights reserved
Canadian Intellectual Property Office
This pattern may not be copied or distributed in any way without the express written permission of the author. The purchaser of this pattern may use the finished piece for personal use and for selling at arts and crafts shows, etc.
No mass production of this design is permitted without permission from the author.
Patterns tested by: Julia Wentz


Saturday, September 19, 2015

Butterfly necklace tutorial by Sandra D Halpenny

 
The Butterfly Lace Necklace pattern is a pattern from my book “Crystal Lace Necklace Patterns” The book is available in print and eBook format. You can purchase the book and ebook on my website or Amazon.
I wanted to share this pattern with you so you can see what fun it is making the necklaces in the book. With the clear diagrams and step-by-step instructions, you will be making all 16 necklaces in no time. And if you make all the necklaces in the book, as an added bonus you can go 2 weeks wearing a different necklace every day. You will be the envy of all your friends.
A = 11˚ seed bead, 1250 beads*
B = 11˚ seed bead, 400 beads*
C = 4mm Fire-polished crystals, 36 crystals*
D = 4mm Fire-polished crystals, 36 crystals*

  *Approximate count for 16" necklace


Start by waxing and stretching your thread, use Nymo D or C-Lon & a #11 or #12 beading needle. I used Fireline 6lb. crystal.  Tie in a "stopper" bead, leaving about an 8" tail and begin at step #1.

1. Pick up 5A, go with thread forward through the first 4 A beads.
2. Pick up 8A, 5B, go with thread forward through the 1st B bead.
3. Pick up 3B, 7A, go with thread forward through the 4th A bead added in step #1 (first time) or the 3rd A bead added in step #16 (every time after), the 8 A, 1st B beads added in step #2 and the 3 B beads just added in this step.
4. Pick up 1A, 1C, 1A, go with thread forward through the 7th A bead added in step #3, down through the 2nd A and C beads just added in this step.

5. Pick up 1A, go with thread forward through the 6th, 7th and 8th A beads, the 1st and 2nd B beads added in step #2.
6. Pick up 16A, 3B, go with thread forward through the 2nd B bead added in step #2, the 1st, 2nd and 3rd A beads just added in this step
7. Pick up 1A, 1C, 1A, go with thread forward through the 10th A bead added in step #6, down through the 2nd A and C beads just added in this step.
8. Pick up 1A, go with thread down through the 1st B bead added in step #6 and up through the 3rd B bead added in step #3.

9. Pick up 1B, go with thread down through the 3 B beads added in step #6, forward through the 2nd and 3rd B beads added in step #2.
10. Pick up 1B, 10A, go with thread through the 2nd and 1st A beads added in step #6, the 3rd B bead added in step #2, the B bead and the 1st A beads just added in this step.
11. Pick up 1D, go with thread forward through the 6th A bead added in step #10 and down through the D bead just added in this step.
12. Pick up 1A, go with thread through the 2nd and 1st A beads added in step #6, forward through the 3rd and 4th B beads added in step #2.
13. Pick up 4B, go with thread up through the B bead added in step #10, forward through the 4th and 5th B beads added in step #2, backwards through the 8th and 7th A beads added in step #2.

14. Pick up 10A, go with thread up through the 1st B bead added in step #13, the 5th B bead added in step #2 and backwards through the 8th and 7th A beads added in step #2.
15. Pick up 1A, 1D, go with thread forward through the 5th A bead added in step #14. Continue with thread down through the D bead just added in this step, the 10th A bead added in step #14, up through the 1st B bead  added in step #13, up through the 5th, 1st and down the 2nd B beads added in step #2 and forward through the 1st through 9th A beads added in step #6. Follow thread path in illustration.
16. Pick up 4A, go with thread up through the 9th A bead added in step #6, forward through the 1st, 2nd and 3rd A beads just added in this step.
17. a) Continue necklace by repeating steps #2 through #16 until you reach the length that you want your necklace to be. To add clasp, see page 9.
b) To add clasp, pick up 3A, clasp, 3A, go with thread up through 2 A beads in necklace. Continue with thread around through the clasp beads several times for strength. Weave the working thread into the necklace and end. Repeat the clasp directions in the same manner at the other end of necklace after removing the stopper bead.


Butterfly Lace Necklace Pattern, N0146
Sample Pattern from “Crystal Lace Necklace Patterns” book
http://www.SandraDHalpenny.com
Sandra D. Halpenny 2006 - 2024 All rights reserved
This pattern may not be copied or distributed in any way without the express written permission of the author. The purchaser of this pattern may use the finished piece for personal use and for selling at arts and crafts shows, etc. No mass production of this design is permitted without permission from the author.


Crystal Lace Necklace Patterns, Bead Weaving Technique
Authored by Sandra D Halpenny 
List Price: $27.99
8" x 10" (20.32 x 25.4 cm)
Full Color on White paper
94 pages
ISBN-13: 978-1477456446
ISBN-10: 1477456449
BISAC: Crafts & Hobbies / Beadwork

This book takes you through 16 necklace patterns with beautiful, full color illustrations and step-by-step directions. To learn the stitch, start at the first and easiest necklace, work your way through the book to the more complicated patterns. You will be making yourself necklaces and learning the net weave stitch too. Even if you have done the net weave stitch, or have done my patterns before, you will enjoy this book of new necklace patterns to add to your collection.


Tuesday, January 28, 2014

Simple Hearts Necklace and Bracelet


Make a fast and fun last minute necklace and bracelet for yourself or your BF for Valentine's Day.


A = Miyuki11/0 seed bead
B = 4mm crystals or fire polished


Start by waxing and stretching your thread, use Nymo D or C-Lon & a #11 or #12 beading needle. Tie in a "stopper" bead, leaving about an 8" tail and begin at step #1.


1. Pick up 4A, go with thread forward through all 4 beads again. Stack the beads as shown in drawing.

2.  Pick up 7A, 1B, 11A, go with thread up through the 3rd and 4th A beads added in step #1 (first time) or the 12th and 11th A beads, step #3 (every time after), forward through the 7 A, 1 B and the 1st, 2nd and 3rd A beads just added in this step.


3.  Pick up 12A, go with thread forward through the 9th and 10th A beads just added. Stack beads as shown in the illustration.


4.  Pick up 7A, go with thread down and then forward through the B bead and the 1st, 2nd and 3rd A beads (of the 11A), step #2. Continue with working thread up and then left to right through the 6th through 1st A beads just added in this step, and down through the 10th through 1st A beads, step #3.


5.  Pick up 3A, go with working thread and follow the
thread path in illustration around through the beads on the outside of heart, coming out with thread up through the 12th and 11th A beads, step $3.


6. Continue necklace by repeating steps #2 through #6 until you reach the length that you want your necklace to be.


7. To add clasp, pick up 3A, clasp, 3A, go with thread up through the 2 A beads in necklace. Continue with thread around through the clasp beads several times. Weave in and end thread. Repeat the clasp directions in the same manner on the other end after removing the stopper bead.


Simple Bracelet Pattern

8. Follow the necklace directions, steps #1 through #6 and make the bottom half of the bracelet to fit your wrist. Flip the first piece vertically and set it aside. Start a second piece by following steps #1 through $4.


9. a) Pick up 1A, go with thread right to left through the 2nd A bead added in the vertical piece added in step #5.
b) Pick up 1A,  go with working thread and follow the thread path in illustration around through the beads on the outside of heart, coming out with thread up through the 12th and 11th A beads, step $3.
10. Continue bracelet by repeating steps #2 through #4, and then step #8 until you reach the other end.


11. On the top part of bracelet, go with working thread down through the 12th A bead, step #3.
To add clasp, pick up 5A, go with thread up through the 4th and 5th A beads added in the last repeat of step #3 and down through the 4th and 5th A beads just added in this step.


12. Pick up 6A, go with thread up through the 5th and 4th A beads added in the bottom piece at a repeat of step #3, and down through the 5th and 6th A beads just added in this step.


13. Pick up 3A, go with thread down through the 12th and 11th A beads, and up through 12th A bead again, added in the bottom piece at a repeat of step #3. Continue with working thread up through the 3 A beads added in this step and the 6th through 2nd A beads, step #12.


14.
Pick up 3A, clasp 3A, go with thread up through the 4th and 5th A beads, step #12. Continue with thread around through the clasp beads several times for strength. Weave the working thread into the necklace and end. Repeat the clasp directions in the same manner at the other end of bracelet after removing the stopper bead.


Sandra D. Halpenny © 2006 - 2024 All rights reserved
This pattern may not be copied or distributed in any way without the express written permission of the author. The purchaser of this pattern may use the finished piece for personal use and for selling at arts and crafts shows, etc. No mass production of this design is permitted without permission from the author.