Showing posts with label Beaded Stitch Tutorial. Show all posts

Tuesday, January 16, 2024

Snowflake #189 Ornament Pattern


This Pattern is Free here on my Blog.
To Purchase a Downloadable PDF for $1.49
Click HERE

Bead Store - 2” Snowflake
A = Miyuki 11° SEED bead, 300 beads
B = Miyuki 15° SEED bead, 36 beads
D = Miyuki 11° DELICA bead, 280 Delica’s

Nymo D Thread or Fireline (6 lb or 8 lb*)

*I used 8 lb for this pattern

#11 or #12 beading needle

Start by waxing and stretching your thread. Use Fireline*, Nymo D or C-Lon and an #11 or #12 beading needle. Tie in a “stopper” bead, leaving about a 8-10” tail and begin at R1. *I have recently started using Fireline® fishing line, too. I like 4lb and 6lb Crystal for bead weaving.


1. Pick up 12A, make a ring by going with thread through the 1st A bead just added. Continue with working thread around through all 12 beads again, plus go through the 1st bead one more time.


2. a) Pick up 3A, go with thread forward through 1 A bead and skipping over 1 A bead in step #1.

b) Repeat (a) around 5 more times

c) Continue with working thread forward through the 1st and 2nd beads added in the first repeat of (a) this Round.

*Please Note: The peyote sides are marked with S1, S2, S3 and S4

3. Pick up 9D, 1A, 3D, 1A, 3D, 1A, 9D, go with thread right to left through the 2nd A bead, step #2 as shown and up through the 1st D bead just added in this step.

4. Add with peyote, 4 D beads up left side (S1), at the 3 corners add 2A beads, add with peyote top left and top right peyote 1 D beads (S2 and S3), and then add 4 D beads down the right side (S4) as shown. Continue with thread right to left through the 2nd A bead, step #2 as shown and up through the 1st D bead step #3 and the 1st D bead just added in this step.

 5. Add with peyote, 4 D beads up left side (S1), at the 3 corners add 1A bead, at top left and top right peyote 2 D beads (S2 and S3), and then add 4 D beads down the right side (S4) as shown. Continue with thread right to left through the 2nd A bead, step #2 as shown and up through the 1st D bead step #3, the 1st D bead, step #4 and the 1st D bead just added in this step.

6.Add with peyote, 1A and then 2B beads up left side (S1), nothing is added at corners, instead go with working thread through 4 beads as shown, add with peyote 1 B bead at the top left (S2 ) at the very top add 5A beads, add with peyote 1 B bead at the top right (S3), and then add 2 B and 1 A beads down the right side (S4) as shown. Continue with thread down through the 3 rows of peyote and right to left through the 2nd A bead, step #2 as shown. Weave through steps #2 and #1 beads as shown coming out with thread right through left through the next 2nd A bead, step #2.

 7. Repeat steps #3 through #5.


8. Add with peyote, 1A and then 2B beads up left side (S1), nothing is added at corners, instead go with working thread through 4 beads as shown, add with peyote 1 B bead at the top left (S2 ) at the very top add 5A beads, add with peyote 1 B bead at the top right (S3), and then add 2 B beads down the right side (S4) as shown. Continue with working thread down through the 1st A bead added in step #6 and then down through the 3 rows of peyote and right to left through the 2nd A bead, step #2 as shown. Weave through steps #2 and #1 beads as shown coming out with thread right to left through left through the next 2nd A bead, step #2.

9. Repeat steps #7 and #8 3 times..

10. Repeat steps #3 through #5. After finishing step #5 repeat, continue with working thread up through the last A bead added in the first step #6 repeat as shown.

11. Add with peyote, 2B beads up left side (S1), nothing is added at corners, instead go with working thread through 4 beads as shown, add with peyote 1 B bead at the top left (S2 ) at the very top add 5A beads, add with peyote 1 B bead at the top right (S3), and then add 2 B beads down the right side (S4) as shown. Continue with working thread down through the 1st A bead added in step #6 repeat as shown and then down through the 3 rows of peyote and left to right through the 2nd A bead, step #2. Weave your working thread into the snowflake and end.

Finishing

After the snowflake is complete, you can stiffen it with SC Johnson Pledge Future Shine. It is a great stiffener; it stays clear even on the crystals. Test it first if you use seed beads with dyed colors to make sure the floor finish doesn’t remove the colors.

Pour enough of the Future Shine into a small container that is wide enough for the ornament. Float the ornament into the Future® Shine and push it around a bit with your finger. (After I am done, I use a funnel and pour the extra back into the bottle).

Take the ornament out and blot both sides with a paper towel.

Put the ornament on a piece of wax paper, shape and flatten it and let it remain on the wax paper to dry. (If you use plastic wrap, the beads can stick a bit to the wrap, so it needs to be moved around a bit to prevent this from happening.) If your ornament needs a little extra flattening, use two pieces of wax paper and sandwich your ornament in between; put a book on top of the wax paper for about an hour. Take the book and the top piece of wax paper off the ornament and let dry overnight on the bottom piece of wax paper.


Optional Natural Stiffener

Gather your Supplies

1 TBSP Corn Starch

1 Cup cold water

1 TBSP White Glue

Wax Paper or plastic Wrap

Paper Towel

Old Pan

Tablespoon

Whisk

Something to swish your beadwork around ( I used a plastic fork)

After the snowflake is complete, you can stiffen it. Test first if you use seed beads with dyed or lined colors to make sure this mix to make sure it doesn’t remove the colors.

Start by whisking together 1 Tablespoon of corn starch with 1 cup of cold water in your pan. Heat just to boiling while whisking in 1 TBSP of white glue. Continue whisking until the mixture starts to boil. Take off of the burner and let cool.

Float your snowflake ornament in the mixture and push it around a bit with your plastic spoon (mine is a fork). Leave for a couple of minutes and then stir around one more time before taking it out to dry.

Take the ornament out and blot both sides with a paper towel. Be especially mindful of your crystals that you rub the mixture off.

Put the ornament on a piece of wax paper, shape and flatten it and let it remain on the wax paper to dry. (If you use plastic wrap, the beads can stick a bit to the wrap, so it needs to be moved around a bit to prevent this from happening.) If your ornament needs a little extra flattening, use two pieces of wax paper and sandwich your ornament in between; put a book on top of the wax paper for about an hour. Take the book and the top piece of wax paper off the ornament and let dry overnight on the bottom piece of wax paper.

Thats it!

Clean up is easy too and no lasting odor.

Enjoy your new snowflakes.

Some other ideas for stiffening your snowflakes, I have not tried any of these but they have been suggested by other beaders and bead designers. Worth a try if nothing else is available. My suggestion is to test it first on a small sample of your beadwork.

ProtectaClear, Permalac NT, and Sally Hansen Hard as Nails nail polish (painted on).

Snowflake Ornament #189 Pattern, S0189
http://www.SandraDHalpenny.com
Sandra D. Halpenny © 2023 All rights reserved
Canadian Intellectual Property Office
This pattern may not be copied or distributed in any way without the express written permission of the author. The purchaser of this pattern may use the finished piece for personal use and for selling at arts and crafts shows, etc. No mass production of this design is permitted without permission from the author. Patterns tested by: Julia Wentz

Tuesday, May 16, 2023

Tila Boogie Bracelet Pattern


This Pattern is Free here on my Blog.
To Purchase a Downloadable PDF for $1.49
Click HERE

Bead Store
A = Miyuki 11° SEED bead, 10* beads
B = 2mm or 3mm Fire-polished Crystals, 8° SEED beads or 10° Triangle beads, 4* beads
C = 4mm Fire-polished Crystals, 1* beads
T = Tila Beads, 2* beads
*Beads counts are per repeat (Unit), each Unit is about 1/2 inch.
Nymo D, C-Lon Thread or Fireline (4 or 6 pound), #11 or #12 beading needle

Start by waxing and stretching your thread. Tie in a “stopper” bead, leaving about a 8-10” tail and begin at step #1.

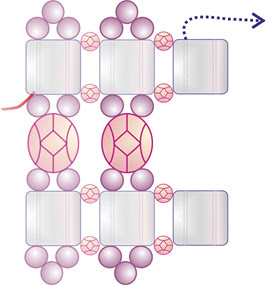
1. a) Pick up 1T.

b) Pick up 13A, go with thread down through the right side hole of the T bead added at (a).

 2. Pick up 1B 1T 1B, go with thread down through the right side hole of the T bead added in the previous step.

3. Pick up 1A, 1C, 1A, 1T, 1B 1T, 1B, go with thread down through the right side hole of the 1st T bead just added.

4. Pick up 3A, go with thread up through the left side hole of the 1st T bead, step #3.

5. a) Pick up 1A, go with thread up through the C bead, step #3.

b) Pick up 1A, go with thread through the left side hole of the T bead, left to right through the 3 A beads, down through the right side hole of the T bead, left to right through the B bead and up through the left side hole of the T bead, as shown


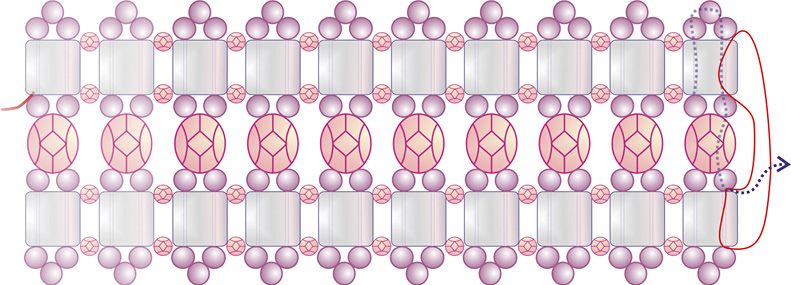
6. Repeat steps #1b through #5b.

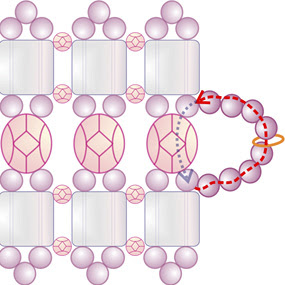
7. Continue by repeating step #7 until the bracelet is the length that you would like. At the last repeat of steps #2 and #4 eliminate adding the extra T beads. See illustration for reference.

8. Add clasps of your choice on both ends Continue with thread around through the clasp beads several times for strength. Weave the working thread into the bracelet and end.

Tila Boogie Bracelet Pattern , B0298
http://www.SandraDHalpenny.com
Sandra D. Halpenny © 2020 - 2023 All rights reserved
Canadian Intellectual Property Office.
This pattern may not be copied or distributed in any way without the express written permission of the author. The purchaser of this pattern may use the finished piece for personal use and for selling at arts and crafts shows, etc. No mass production of this design is permitted without permission from the author.


Friday, January 13, 2023

Fancy Night Necklace Pattern


This Pattern is Free here on my Blog.
To Purchase a Downloadable PDF for $1.49 Click HERE

Bead Store
A = Miyuki 11° SEED bead, color 1, 60 beads*
B = Miyuki 11° SEED bead, color 2, 90 beads*
C = 4 mm Fire-polished crystal, 3 crystals*
V = Czech VEXOLO 5 x 8 mm beads , 3*
Nymo D Thread or Fireline (4 or 6 pound)#11 or #12 beading needle
*Bead Counts are per repeat,repeat is approximately 1-1/4"

Start by waxing and stretching your thread.
Tie in a “stopper” bead, leaving about a 8-10” tail and begin at step #1.

Abbreviation
TV = Top hole of the Vexolo bead
BV = Bottom hole of the Vexolo bead


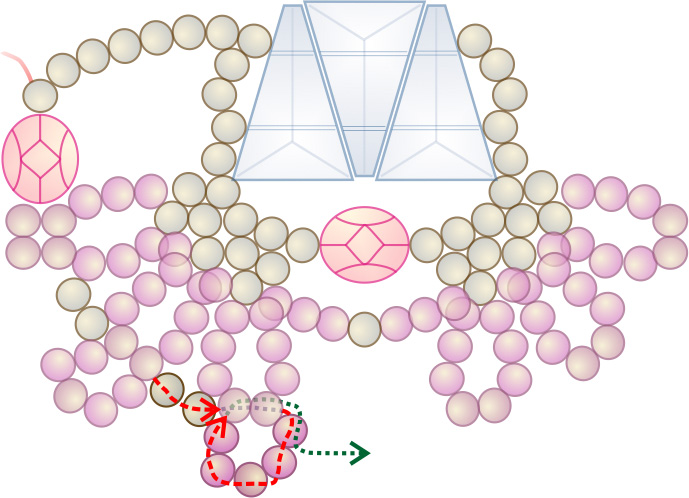
1. Pick up 1A, 1C, 4B, go with thread down and then up (forward) through the 4 B beads, the 1 C bead and the 1st A bead as shown.


2. Pick up 7A, 1TV, 1BV, 1TV, 4A, go with thread right to left through the BT, TV and BT beads just added.

 
3. Pick up 3A, go with thread left to right through the 7th A bead, the 3 V beads as shown and down through the set of 4 A beads, step #2.

4. Pick up 5A, 1C, 5A, go with thread up through the 3 A beads, step #3, left to right and then down through the 7th A bead, the 3 V beads as shown and down through the set of 4 A beads, step #2, and the 1st and 2nd A beads just added in this step.
 

5. Pick up 3A, go with thread forward through the 2nd and 3rd A beads, step #4.
 

6. Pick up 2A, go with thread down into and through the 1st A bead, step #5, and forward through the 3rd and 4th A beads, step #4.


7. a) Pick up 2A, go with thread down into and forward through 1st A bead, step #6,and forward through the 4th and 5th A beads, the C bead and the 1st and 2nd A beads (of the second set of 5A), step #4.
b) Pick up 3A, go with thread through the 2nd and 3rd A beads (of the second set of 5A), step #4.


8. Pick up 2A, go with thread down into and forward through 1st A bead, step #7b, and the 3rd and 4th A beads (of the second set of 5A), step #4.

9. Pick up 2A, go with thread down into and forward through the 1st A,bead, step #8, the 4th A bead (of the second set of 5A), step #4, and forward through the 1st and 2nd A beads just added in this step.
 

10. a) Pick up 3B, go with thread up through the 3rd and 4th B beads, step #1 or the 2 B beads, step #24.
b) Pick up 3B, go with thread down through the 2nd A bead, step #9.

11. a) Pick up 1B, go with thread left to right through the 2nd A bead, step #8.
b) Pick up 8B, go with thread left to right through the 2nd A bead, step #8.

12. a) Pick up 1B, go with thread left to right through the 2nd A bead, step #7b.
b) Pick up 8B, go with thread left to right through the 2nd A bead, step #7b.

13. Pick up 3B, 1A, 3B, go with thread left to right through the 2nd A bead, step #7a


14. a) Pick up 8B, go with thread left to right through the 2nd A bead, step #7a.
b) Pick up 1B, go with thread left to right through the 2nd A bead, step #6.

15. a) Pick up 8B, go with thread left to right through the 2nd A bead, step #6.
b) Pick up 1B, go with thread left to right through the 2nd A bead, step #5.
 

16. Pick up 8B, go with thread left to right through the 2nd and 3rd A beads, step #5. Continue with working thread by following the thread path in illustration through, coming out with thread right to left through the 3 B beads added in step #10a.

17. a) Pick up 2A, go with thread left to right through the 5th and 4th B beads, step #11b.
b) Pick up 5B, go with thread left to right through the 5th and 4th B beads, step #11b.

18. Pick up 5B, go with thread left to right through the 1 A bead, step #13.
 

19. a) Pick up 2A, go with thread left to right through the 5th and 4th B beads, step #12b.
b) Pick up 5B, go with thread left to right through the 5th and 4th B beads, step #12b, and the 1st B bead just added in this step.
 

20. Pick up 3B, 1C, go with thread up through the 3rd, 4th and 5th B beads, step #19, left to right through the 1 A bead, step #13, and down through the 3 B beads just added in this step.
 

21. Pick up 3B, go with thread left to right through the 5th and 4th A bead, step #14a.
 

22. Pick up 4B, go with thread forward through the 3rd B bead, step #21, and left to right through the 5th and 4th A bead, step #14a.

23. a) Pick up 2A, go with thread left to right through the 5th and 4th B beads, step #15a.
b) Pick up 5B, go with thread left to right through the 5th and 4th B beads, step #15a.
c) Pick up 2A, go with thread left to right through the 5th and 4th B beads, step #16.

24. Pick up 2B, go with thread up and then left to right through the 5th through 1st B beads, step #16. Continue with working thread by following the thread path in illustration through, coming out with thread left to right through the 1st A bead (of the 4A), step #2.
 

25. Pick up 7A, 1C, go with thread down through the 4th and 5th B beads, step #16, up through the 2 B beads, step #24, the C bead and the 7th A bead just added in this step.
 

26. Continue necklace by repeating steps #2 through #25 until you reach the length you want your necklace to be.


27. To add clasp, pick up 4B, clasp, 4B, go with thread up through 1 C and 1 A beads in necklace. Continue with thread around through the clasp beads several times for strength. Weave the working thread into the necklace and end. Repeat the clasp directions in the same manner at the other end of necklace after removing the stopper bead.

Fancy Night Necklace Pattern, N0352
http://www.SandraDHalpenny.com
Sandra D. Halpenny © 2014 - 2023 All rights reserved
Canadian Intellectual Property Office
This pattern may not be copied or distributed in any way without the express written permission of the author. The purchaser of this pattern may use the finished piece for personal use and for selling at arts and crafts shows, etc. No mass production of this design is permitted without permission from the author. Patterns tested by: Julia Wentz


Layered Flower Pattern


Peyote Petal Flower Pattern


Beaded Flower #4 Pattern


Flowers of Color Doily