Showing posts with label beaded closure. Show all posts

Friday, December 30, 2022

Penelope Bracelet Pattern


Bead Store
A = Miyuki 11° SEED bead, 100* beads
B = 6mm Bugle beads, 4*
C = 4 mm Fire-polished crystals, 3* beads
D = 3mm Fire-polished crystals, 3* beads
E = Czech 6 x 9 oval crystal, 1* beads
V = Czech Vexolo 2-hole beads, 4* beads
Nymo D, C-Lon Thread or Fireline (4 or 6 pound), #11 or #12 beading needle
*Beads counts are per repeat (Unit), repeats for this bracelet are about 3/4 inch.
6-1/2 inch bracelet has 7 repeats.
Please Note: In the illustrations in steps #14 and #15 it shows I am using a 4mm bead but I actually used 3mm beads that works better.
 
This Pattern is Free here on my Blog.
To Purchase a Downloadable PDF for $1.49
Click HERE
 

Start by waxing and stretching your thread. Tie in a “stopper” bead, leaving about a 8-10” tail and begin at step #1.

1. Pick up (1A, 1E, 3A, 1B, 1A, 1C), 1A, 1B, 2A, go with thread forward through the ( ) beads just added in this step.

2. Pick up 1A, 1B, 3A, 1E, 3A, 1B, 1A, go with thread down through the 1 C bead added in the last step. Continue with working thread by following the blue dotted line in the illustration going through the beads, coming out with thread left to right through the 1 A bead shown


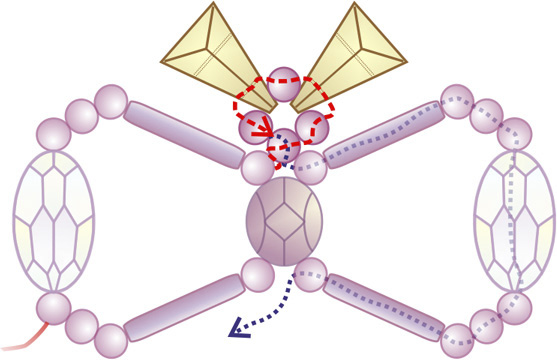
3. Pick up 2A, 1V, 1A, 1V, 1A, go with thread left to right through the 1st A bead just added in this step, and around through the beads added in step #2 by following the blue dotted line in the illustration,  coming out with thread right to left through the 1 A bead as shown.

4. Pick up 2A, 1V, 1A, 1V, 1A, go with thread right to left through the 1st A bead just added in this step, 1 A bead, 1 B bead and 1 A bead as shown.

5. a) Pick up 3A, go with thread left to right through the top hole of the 1st V bead, step #4.

b) Pick up 1A, 1C, 1A, go with thread left to right through the top hole of the 2nd V bead, step #4.

c) Pick up 3A, go with thread right to left through 1 A, 1B, 1 A beads as shown and up through the C bead, step #1 or step #11.

6. Pick up 6A, go with thread up through the E bead, step #2.

7. a) Pick up 3A, go with thread forward through the 3rd A bead, step #6.
b) Pick up 2A, go with thread up through the C bead, step #1 or step #11.

8. Pick up 6A, go with thread up through the E bead, step #1 or step #2.

9. a) Pick up 3A, go with thread forward through the 3rd A bead, step #8.
b) Pick up 2A, go with thread up through the C bead, step #1 or step #11. Continue with working thread right to left through 1 A bead, 1 B bead and 1 A bead as shown.

10. a) Pick up 3A, go with thread left to right through the top hole of the 2nd V bead, step #3.
b) Pick up 1A, 1C, 1A, go with thread left to right through the top hole of the 1st V bead, step #3.
c) Pick up 3A, go with thread right to left through 1 A, 1 B, 1 A beads as shown and down through the C bead, step #1 or step #11 left to right through the 1 A, 1 B, 3 A beads and then up through the 1 E bead and the next A bead, as shown.


11. Pick up 2A, 1B, 1A, 1C, 1A, 1B, 2A, go with thread up through 1 A bead, 1 E bead and 1 A bead, as shown, and forward through 2 A , 1 B, 1 A and 1 C beads just added in this step.

12. Repeat steps #2 through #11.

13. Continue by repeating steps #11 through #12 until the bracelet is the length that you would like. On the last repeat end at step #10.

14. To add clasp and turn, add a circle of beads. This step can be done any way that you would like. After finishing adding your closure, continue with working thread down through and coming out right to left through the 2nd A bead, step #5b.

15. a) Pick up 4A, go with thread right to left through the 1st A bead, step #5b, the top hole of the 1st V bead, step #4, and the 3 A beads, step #5a.
b) Pick up 1D*, go with thread right to left through the 3 A beads, step #5c, the top hole of the 2nd V bead, step #4, and the 2nd A bead, step #5b.
c) Repeat (a) and (b) to the other end and ending at a repeat of step (a).

Continue with working thread weaving through the bracelet, coming out with thread left to right through the 1st A bead, step #10b.

*Please Note: In this illustration I drew a 4mm bead but I actually used 3mm beads that works better.

16. a) Pick up 4A, go with thread left to right through the 2nd A bead, step #10b, the top hole of the 1st V bead, step #3, and the 3 A beads, step #10c.
b) Pick up 1D*, go with thread left to right through the 3 A beads, step #10a, the top hole of the 2nd V bead, step #3, and the 1st A bead, step #10b.
c) Repeat (a) and (b) to the other end and ending at a repeat of step (a). Weave the working thread into the bracelet and end.

After removing the stopper bead, use the tale to add a closure to the other end of your bracelet. Weave the working thread into the bracelet and end.

*Please Note: In this illustration I drew a 4mm bead but I actually used 3mm beads that works better.

Penelope Bracelet Pattern, B0286
http://www.SandraDHalpenny.com
Sandra D. Halpenny © 2019 - 2024 All rights reserved
Canadian Intellectual Property Office
This pattern may not be copied or distributed in any way without the express written permission of the author. The purchaser of this pattern may use the finished piece for personal use and for selling at arts and crafts shows, etc. No mass production of this design is permitted without permission from the author. Patterns tested by: Julia Wentz

Friday, December 16, 2022

Snowflake Box Pattern


This Pattern is Free here on my Blog.
To Purchase a Downloadable PDF for $1.99 Click HERE

Bead Store
1 inch Square Box _ optional
Blue = Miyuki 11° Delica bead, 2,140 beads (approximately 10 grams)
White Pearl = Miyuki 11° Delica bead, 188 (approximately 1 grams)
Miyuki 15° Seed bead, color of choice, 55 (less than 1 gram)

Nymo D, C-Lon Thread or Fireline (4 or 6 pound), #11 or #12 beading needle.

Be aware that if you use Fireline it is not as bendable as the thread. Try to work a bit looser and continuously bend the edges down while working on your piece.

**Start by waxing and stretching your thread (not needed if using Fireline). Tie in a “stopper” bead, leaving about a 6-8” tail for weaving in later and begin.

Need some Basic Peyote Stitch Instructions: 
https://sandrahalpennybeading.blogspot.com/2016/01/peyote-beaded-graph-pattern-free-pattern.html


Finished pieces before weaving the sides and tops together.
Top Piece

Bottom Piece


Start Box Liner
D = Miyuki 11° Delica bead 
S = Miyuki 15° Seed bead

R = Round
Rounds begin with a Red dot
For the bottom of the Liner I used 3 different colors just for ease of seeing the rounds. You can use what ever color you prefer. How about Hot Pink!

The liner starts in Circular, flat peyote stitch. Then the sides are worked in Tubular peyote. 


Please Note: Place the Liner in your box. You can just place it, sew it or glue it permanently in.


Please Note:If you have an original Thread Heaven box you can use that instead of the beaded liner if you prefer.


Round 15 through Round 29 are worked with Delica beads, the last Round is worked with 15/0 seed beads.


Snowflake Box Pattern, Box201
Sandra D. Halpenny © 2021 All rights reserved
Canadian Intellectual Property Office 
This pattern may not be copied or distributed in any way without the express written permission of the author. The purchaser of this pattern may use the finished piece for personal use and for selling at arts and crafts shows, etc. No mass production of this design is permitted without permission from the author. Patterns tested by: Julia Wentz

Sunday, August 28, 2016

Beaded Nepal Chain Stitch - Learn How


The Nepal Chain Stitch is so pretty and yet so easy to bead. I have always liked this stitch for the ease of making it. You can make a bracelet in less than an hour. I have also given you instructions to make the little toggle closure. You can even wear it in the front for a little extra sparkle. 

When starting your piece, leave a tail thread of about 12 inches. You will be using this thread later for adding the other end of your closure.


I broke step #2 and then #3 into 2 steps because you need to do each part completely before moving to the 2nd part. Doing this step this way helps with the thread not showing as much when the piece is finished.

A = Miyuki, 11° SEED bead, pink
B = Miyuki, 11° SEED bead, green
C = 4 mm Fire-polished crystal

Start by waxing and stretching your thread, use Nymo D or C-Lon & 
a #11 or #12 beading needle. I used Fireline 6lb. crystal. 
Tie in a "stopper" bead, leaving about an 12" tail and begin at step #1.

 
1. Pick up 3B, 5A, go with thread down thorough the 3rd and 2nd B beads, and then up through the 1st, 2nd and 3rd B beads just added.
2. a) Pick up 3B, 5A, go with thread down through the 3 B beads, pull up thread snug before moving onto the second part of this step.
b) Continue with working thread up through the 5th A bead added in the last step. Pull up working thread snug.
3. a) Pick up 3B, 5A, go with thread down through the 3 B beads, pull up thread snug before moving onto the second part of this step.
b) Continue with working thread up through the 5th A bead added in the last step. Pull up working thread snug.


4. Continue by repeating steps #2a through #3b until you reach the length that you would like. To follow the illustrations either flip your piece to march the diagram or end after repeating a step #2b.

5. To start toggle closure, Pick up 2B, go with thread up thorough the 3rd B bead and the 1st and 2nd A beads as shown.
6. Pick up 2B, 5A, go with thread down through the 2 B beads, pull up thread snug before moving onto the next step.
7. Pick up 3B, 5A, go with thread down through the 3rd and 2nd B beads, pull up thread snug.
8. Pick up 3B, 5A, go with thread down through the 3rd and 2nd B beads, pull up thread snug.
9. Pick up 2B, follow the thread path in illustration through with working thread, coming out at the 5 A beads added in step #6.
10. a) Pick up 1C, go with thread around through the 5 A beads, step #7. b) Pick up 1C, go with thread around through the 5 A beads, step #8. Continue with working thread around through the toggles beads several times to add strength. Weave the working thread into your piece and end.
11. Go to the other end of your piece and remove the stopper bead. Put your thread tail on a needle and Pick up 5B, go with thread down through the 2nd and 3rd B beads, step #2, the 2nd and 3rd B beads, step #1 and the 1st and 2nd B beads just added in this step.
12. Pick up 17B (adjust this number of beads if you need to), go with thread through the 1st and 2nd B beads, step #11. Continue with working thread around through the loop beads several times to add strength. Weave the working thread into your piece and end.


Beaded Nepal Chain Stitch lesson
http://www.SandraDHalpenny.com
Sandra D. Halpenny © 2010 - 2023 All rights reserved
Canadian Intellectual Property Office
This pattern may not be copied or distributed in any way without the express written permission of the author. The purchaser of this pattern may use the finished piece for personal use and for selling at arts and crafts shows, etc. No mass production of this design is permitted without permission from the author. Patterns tested by: Julia Wentz