
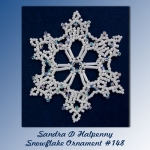
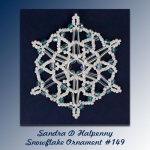
Design by Sandra D. Halpenny
Bead Store - 1” Snowflake
A = Miyuki 11/0 SEED bead, white, 97 beads
B = Miyuki 10/0 Triangle bead, white, 12 beads
C = 3mm Crystal, 4 crystals
Nymo D Thread or Fireline (4 or 6 pound)
#11 or #12 beading needle
Start by waxing and stretching your
thread. Use Fireline*, Nymo D or C-Lon and an #11 or #12 beading needle.
Tie in a “stopper” bead, leaving about a 8-10” tail and begin at R1.
*I have recently started using Fireline® fishing line, too. I like 4lb
and 6lb Crystal for bead weaving.

Round 1


c) Pick up 1C, go with thread right to left through the 1 A bead added in this Round at (a), down through the 1 C bead just added in this step, and forward through 1 A, 1 B, 2 A and the 1st B beads added in Round 1 as shown.


Pick up 1B, 2A, 1B, 2A, 1B, 2A, 1B, 2A, 1B, 2A, 1B,
2A, make a circle and go with thread through the 1st B bead just added.
Round 2
a) Pick up 1C, 1A, 1A, go with thread down through the 4th B bead added in R1, right to left through the 3 beads just added in this step, up then forward through the 1st B, 2 A, 1 B and 1st A beads added in R1 as shown.
b) Pick up 1C, go with thread left to right through the 1 A bead added in this Round at (a), up through the 1 C bead just added in this step, forward through 1 A, 1 B, 2 A, 1 B, 2 A, 1 B, 1st A beads in Round 1 as shown.
Round 3
a) Pick up 2A, 1B, 2A, go with thread forward through the
next 1 B bead forward added in Round 1.
b) Repeat (a) around 5
more times.
c) Continue with working thread up through the 1st and 2nd A
beads in the first repeat of (a) this Round.

Round 4
a) Pick up 6A, go
with thread down through the 3rd A bead just added in this step.
b) Pick up 2A, go
with thread down through the 1st A bead (of the second set of 2A), R3a.
c) Pick up 2A, go
with thread up through the 2nd A bead (of the first set of 2A), next repeat
forward, R3a.
c) Repeat (a, b, c)
around 5 more times.
d) Weave the working thread into the snowflake and
end.

Snowflake Tips
Bead colors for rounds R = Round
Each Round begins at the red dot
in drawing
The snowflakes are done in Rounds.
Making hangers for your snowflake
Make it with beads, make a loop with as many beads as you
would like, or use a piece of fishing line, making it invisible with
mono-filament or a piece of pretty ribbon. Add ribbon after your snowflake
is stiffened.
Finishing
After the snowflake is complete, you can stiffen it with SC
Johnson Pledge Future shine. It is a great stiffener; it stays clear even on the
crystals. Test it first if you use seed beads with dyed colors to make sure
the floor finish doesn’t remove the colors.
Pour enough of the Future® Shine into a small container that
is wide enough for the ornament. Float the ornament into the Future® Shine and
push it around a bit with your finger. (After I am done, I use a funnel and
pour the extra back into the bottle)
Take the ornament out and blot both sides with a paper
towel.
Put the ornament on a piece of wax paper, shape and flatten
it and let it remain on the wax paper to dry. (If you use plastic wrap, the
beads can stick a bit to the wrap, so it needs to be moved around a bit to
prevent this from happening.) If your ornament needs a little extra
flattening, use two pieces of wax paper and sandwich your ornament in between;
put a book on top of the wax paper for about an hour. Take the book and the top
piece of wax paper off the ornament and let dry overnight on the bottom piece
of wax paper.
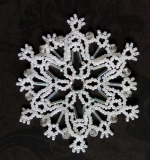
Snowflake Ornament #31 Pattern, S0031
http://www.SandraDHalpenny.com
Sandra D. Halpenny © 2010 - 2019 All rights reserved, Canadian Intellectual Property Office
This pattern may not be copied or distributed in any way without the express written permission of the author. The purchaser of this pattern may use the finished piece for personal use and for selling at arts and crafts shows, etc. No mass production of this design is permitted without permission from the author.
1 comment:
THANKS
Post a Comment