Tuesday, May 16, 2023

Tila Boogie Bracelet Pattern


This Pattern is Free here on my Blog.
To Purchase a Downloadable PDF for $1.49
Click HERE

Bead Store
A = Miyuki 11° SEED bead, 10* beads
B = 2mm or 3mm Fire-polished Crystals, 8° SEED beads or 10° Triangle beads, 4* beads
C = 4mm Fire-polished Crystals, 1* beads
T = Tila Beads, 2* beads
*Beads counts are per repeat (Unit), each Unit is about 1/2 inch.
Nymo D, C-Lon Thread or Fireline (4 or 6 pound), #11 or #12 beading needle

Start by waxing and stretching your thread. Tie in a “stopper” bead, leaving about a 8-10” tail and begin at step #1.

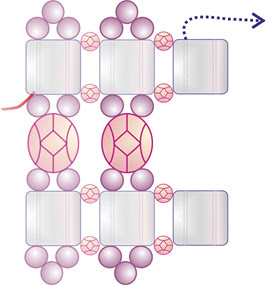
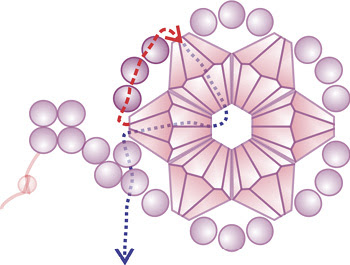
1. a) Pick up 1T.

b) Pick up 13A, go with thread down through the right side hole of the T bead added at (a).

 2. Pick up 1B 1T 1B, go with thread down through the right side hole of the T bead added in the previous step.

3. Pick up 1A, 1C, 1A, 1T, 1B 1T, 1B, go with thread down through the right side hole of the 1st T bead just added.

4. Pick up 3A, go with thread up through the left side hole of the 1st T bead, step #3.

5. a) Pick up 1A, go with thread up through the C bead, step #3.

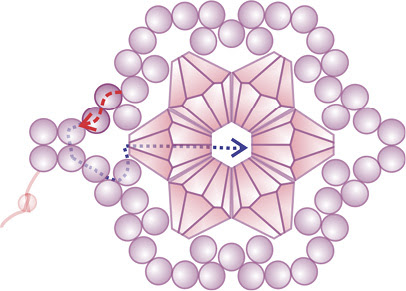
b) Pick up 1A, go with thread through the left side hole of the T bead, left to right through the 3 A beads, down through the right side hole of the T bead, left to right through the B bead and up through the left side hole of the T bead, as shown


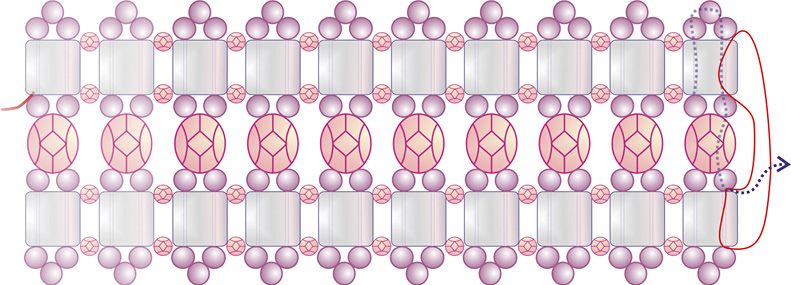
6. Repeat steps #1b through #5b.

7. Continue by repeating step #7 until the bracelet is the length that you would like. At the last repeat of steps #2 and #4 eliminate adding the extra T beads. See illustration for reference.

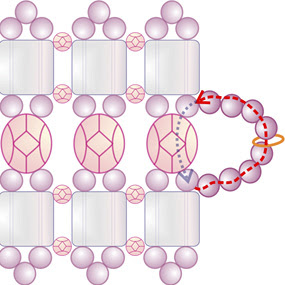
8. Add clasps of your choice on both ends Continue with thread around through the clasp beads several times for strength. Weave the working thread into the bracelet and end.

Tila Boogie Bracelet Pattern , B0298
http://www.SandraDHalpenny.com
Sandra D. Halpenny © 2020 - 2023 All rights reserved
Canadian Intellectual Property Office.
This pattern may not be copied or distributed in any way without the express written permission of the author. The purchaser of this pattern may use the finished piece for personal use and for selling at arts and crafts shows, etc. No mass production of this design is permitted without permission from the author.


Wednesday, April 26, 2023

Blooming Bugles Necklace Pattern

Bead Store
A = Miyuki 11° SEED bead, #214, 28 beads
B = Miyuki 11° SEED bead, #259, 22 beads
C = 4mm Fire-polished Crystals, Green, 1 bead
D = 4mm Fire-polished Crystals, Salmon, 3 beads
E = #3 (1/4”) Bugle, Tr. Orange AB, 4 bugles

This Pattern is Free here on my Blog.
To Purchase a Downloadable PDF for $2.49
Click HERE

Nymo D, C-Lon Thread or Fireline (4 or 6 pound), #11 or #12 beading needle
Start by waxing and stretching your thread. Tie in a “stopper” bead, leaving about a 8-10” tail and begin at step #1.

1. Pick up 12B, go with thread forward through the 1st through 7th a beads just added in this step.

2. Pick up 4B, go with thread down through the 7th B bead, step #1 or step #10, the 6th B bead, step #10 and forward through the1st and 2nd B beads just added in this step.

3. Pick up 1B go with thread right to left through the 3rd and 4th B beads, step #2 down through the 7th B bead step #1 or step # and left to right through the 1st B bead, step #2.

4. Pick up 1B, 1C, 4B, go with thread forward (left to right) through the 1st, down through the 2nd B bead, and right to left through the 3rd B bead (of the 4B) just added in this step.

5. Pick up 2A, 1E, 4A, 1D, 2A, go with thread forward (left to right) through the 2nd A bead (of the 4A) just added in this step.

6. Pick up 1A, 1E 1A, go with thread up through the 1st A bead in step #5, and left to right through the 3rd B bead (of the 4B), step #4.


7. Pick up 2A, 1E, 4A, 1D, 2A, go with thread forward (left to right) through the 2nd A bead (of the 4A) just added in this step.

 8. Pick up 1A, 1E 1A, go with thread up through the 1st A bead in step #7, right to left through the 3rd B bead (of the 4B), step #4, down through the 1st A bead, Step #5, and the 3 beads added in step #6.


9. a) Pick up 4A, 1D, 1A, go with thread up through the D bead and the 4th A bead just added in this step.

b) Pick up 3A, go with thread up through the 1st A bead (of the 4A) the E bead and the 2nd and 1st A beads, step #7, right to left through the 3rd B bead up through the 4th B bead, left to right through the 1st B bead, up through the C bead and the 1st B bead step #4, left to right through the 2nd B bead, step #2 and up through the B bead, step #3.


10. Pick up 11B, go with thread up through the B bead, step #3 and forward through the 1st through the 6th B bead just added in this step.


11. Continue by repeating steps #2 through #10 until the necklace is the length that you would like.


12. Add clasps of your choice on both ends Continue with thread around through the clasp beads several times for strength. Weave the working thread into the necklace and end.

Sandra D. Halpenny © 2023 - 2026 All rights reserved
Canadian Intellectual Property Office
This pattern may not be copied or distributed in any way without the express written permission of the author.
The purchaser of this pattern may use the finished piece for personal use and for selling at arts and crafts shows, etc. No mass production of this design is permitted without permission from the author.
Patterns tested by: Julia Wentz


Friday, March 17, 2023

Tangelo Necklace Pattern

 Tangelo Necklace

Bead Store
A = Miyuki 11° SEED bead, 38* beads
B = 4mm Fire-polished Crystals, first color, 2* beads
C = 4mm Fire-polished Crystals, second color, 2* beads
*Beads counts are per repeat (Unit), each Unit is about 3/4 inch.

Nymo D, C-Lon Thread or Fireline (4 or 6 pound), #11 or #12 beading needle
Start by waxing and stretching your thread. Tie in a “stopper” bead, leaving about a 8-10” tail and begin at step #1.


1. Pick up 1B, 5A, go with thread forward through the B bead just added in this step.


2.
Pick up 3A, 1B, 5A, go with thread forward through the B bead just added in this step.

3. a) Pick up 4A, 1C, 4A, go with thread forward (down) through the B bead and the 1st A bead, step #1.
b) Pick up 3A, go with thread forward (up) through the 5th A bead and the 1 B bead, step #2.


4. Pick up 1A, 1C, 1A, 1B, 5A, go with thread forward through the B bead just added in this step.

5. Pick up 3A, 1B 5A, go with thread forward through the B bead just added in this step.

6. a) Pick up 4A, 1C, 4A, go with thread forward (down) through the B bead and the 1st through 4th A beads, step #5.
b) Pick up 3A, go with thread down through the 5th A bead and the 2nd A bead, step #4.


7. a) Pick up 3A, go with thread left to right through the 2nd A bead, step #6b.
b) Pick up 3A, go with thread forward (up) through the 4th and 5th A bead, down through the B bead and the 1st A bead, step #4.

8. Pick up 3A, go with thread forward (up) through the 5th A bead and the B bead, step #5.

9. Continue by repeating steps #4 through #7 until the necklace is the length that you would like.

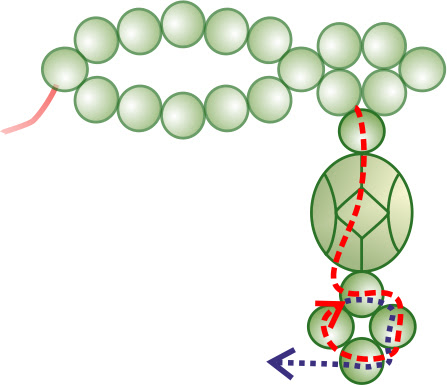
10. a) To add clasp, Pick up 4A clasp 4A, go with thread up through the 1st A bead, step #5 repeat.

b) Pick up 1A, go with thread up through the 1st A bead, step #6a repeat.
Continue with thread around through the clasp beads several times for strength. Weave the working thread into the necklace and end.

Tangelo Necklace Pattern, N380
http://www.SandraDHalpenny.com

Sandra D. Halpenny © 2023 All rights reserved
Canadian Intellectual Property Office
This pattern may not be copied or distributed in any way without the express written permission of the author. The purchaser of this pattern may use the finished piece for personal use and for selling at arts and crafts shows, etc. No mass production of this design is permitted without permission from the author.

Friday, February 3, 2023

Crystal Flowers Bracelet Pattern

This Pattern is Free here on my Blog.
To Purchase a Downloadable PDF for $1.49 Click HERE

Bead Store
A = Miyuki 11° SEED bead, 54*
B = 4mm crystal, 6*
C = 4mm pearl, 1*
*Bead Counts are per repeat, Repeat is approximately 1”

Nymo D, C-Lon Thread or Fireline (4 or 6 pound), #11 or #12 beading needle

Start by waxing and stretching your thread. Tie in a “stopper” bead, leaving about a 8-10”


1. Pick up 4A. Go with thread through the 1st, 2nd, 3rd and 4th A beads. Stack as shown.
 
2. Pick up 4A, 2B, 1A. Go with thread down through the 3rd and 4th A beads and the 1st B bead added in this step.
 
3. Pick up 1B, 3A. Go with thread up through the 1st B bead, step #2 and down through the 1 B added in this step.
 
4. Pick up 3A, 1B. Go with thread down through the 1 B bead added in step #3 and forward through the 3 A and 1 B beads added in this step.
 
5. Pick up 1B, 3A. Go with thread forward through the 1 B bead, step #4 and the 1 B bead added in this step.
 
6. Pick up 3A, 1B. Go with thread through the 1 B bead added in step #5, the 3 A and 1 B beads added this step and up through the 2nd B bead added in step #2.
 
7. Pick up 3A. Go with thread down through the 1 B bead added in step #6 and forward through the 2nd B bead, step #2, the last A bead added in step #2 and the 3rd A bead (of the 4A) added in step #2.
 

8. a) Pick up 5A. Go forward through the 2nd A bead added in step #3.
b) Pick up 5A. Go forward through the 2nd A bead added in step #4.
 

9. Pick up 6A. Go with thread forward through the 2nd A bead added in step #5.
 

10. a) Pick up 5A. Go with thread through the 2nd A bead added in step # 6.
b) Pick up 5A. Go with thread through the 2nd A bead added in step #7.


11. Pick up 2A. Go with thread down through the 3rd and 4th A beads, step #1, (first time) or the 2 A beads added in step #12 (every time after). Continue with thread left to right through the 1st A bead, up through the last A bead and left to right through the 2nd B bead, step #2.
 
12. Pick up 1C. Go forward with thread through the 1 B and 3rd A beads added in step #4. Continue with thread through the 1st, 2nd, 3rd and 4th A beads added in step #9.
 

13. Pick up 2A. Go with thread up through the 3rd and 4th A beads added in step #9 and down through the 1st and 2nd A beads just added in this step.
 

14. Continue by repeating steps #2 through #13 until the necklace is the length that you would like.
 

15. To add clasp, pick up 3A, clasp, 3A, go with thread down through 2 A beads in necklace. Continue with thread around through the clasp beads several times for strength. Weave the working thread into the necklace and end. Repeat the clasp directions in the same manner at the other end of necklace after removing the stopper bead.

Crystal Flowers Bracelet Pattern, B0127
http://www.SandraDHalpenny.com
Sandra D. Halpenny © 2005 - 2023 All rights reserved
Canadian Intellectual Property Office
This pattern may not be copied or distributed in any way without the express written permission of the author. The purchaser of this pattern may use the finished piece for personal use and for selling at arts and crafts shows, etc. No mass production of this design is permitted without permission from the author.

  Peyote Purse #23 Necklace Graph Pattern

Layered Flower Pattern

Tea Light Pattern

Picot Heart #4 Pattern